")
One big mistake that some small business owners make is thinking that once their website is up and running, they are all done. Nothing could be further from the truth! Post-launch, small business owners should continuously be analyzing their website performance and engagement to strengthen marketing efforts. Google Search Console is one of many tools that small businesses can use to achieve this. Using data from tools like Google Search Console can give small business owners insights on what may help improve their website’s performance and visibility on search engines. Best of all, it is completely free! You may be wondering how to verify domain ownership on Google Search Console if you’re in the beginning stages of SEO set-up on this platform. If so, you’re in the right place!
What’s So Great About Google Search Console Anyway?
If you’re new to the world of SEO, all of the tools used to help grow and monitor your website’s SEO may be new to you. Setting up Google Search Console is one of many steps Desert Rose Design & Photo Co. takes to help clients hit the ground running with SEO post-launch. By having Google Search Console set up in the beginning stages post-launch, you will be able to keep track of:
- How often your site appears in Google search results
- Which keywords are driving traffic to your website, and
- How users are interacting with your pages
Google Search Console also provides alerts about technical issues like broken links so that businesses can quickly resolve issues and improve user experience. With insights from Google Search Console, small businesses can make data-driven decisions to enhance SEO, reach more customers, and grow their online presence effectively. That’s why it is so highly recommended at Desert Rose Design & Photo Co.!
A Little About Domain Verification
Verifying your domain on Google Search Console is essential for accessing valuable insight into your website’s performance and improving its SEO. One of the easiest and most secure methods to verify your domain is by adding a TXT record. Although there are other ways to verify your name such as using a URL prefix or creating an HTML file, the TXT method is recommended because it proves your ownership across the entire domain, including all subdomains.
In this guide, I’ll be walking you through each step of verifying your domain with a TXT record. In no time, you’ll be able to use Google Search Console to improve your site’s visibility and SEO!
Step 1: Access Google Search Console
- Go to Google Search Console.
- Sign in with your Google account or create one if you don’t already have one.
- Click on “Start Now” to enter the Search Console dashboard.
Step 2: Add Your Domain to Google Search Console
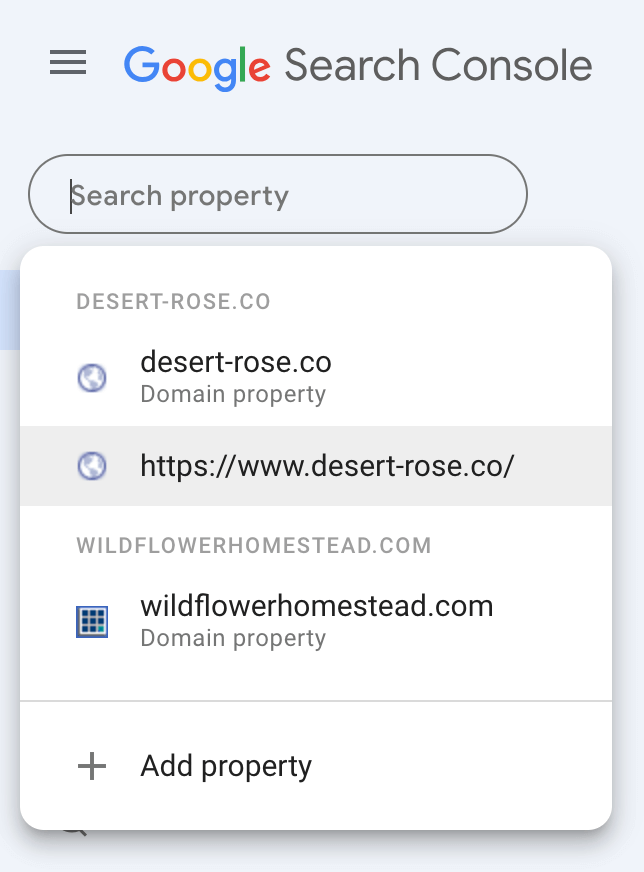
- From the dashboard, click “Add Property” in the upper left corner.
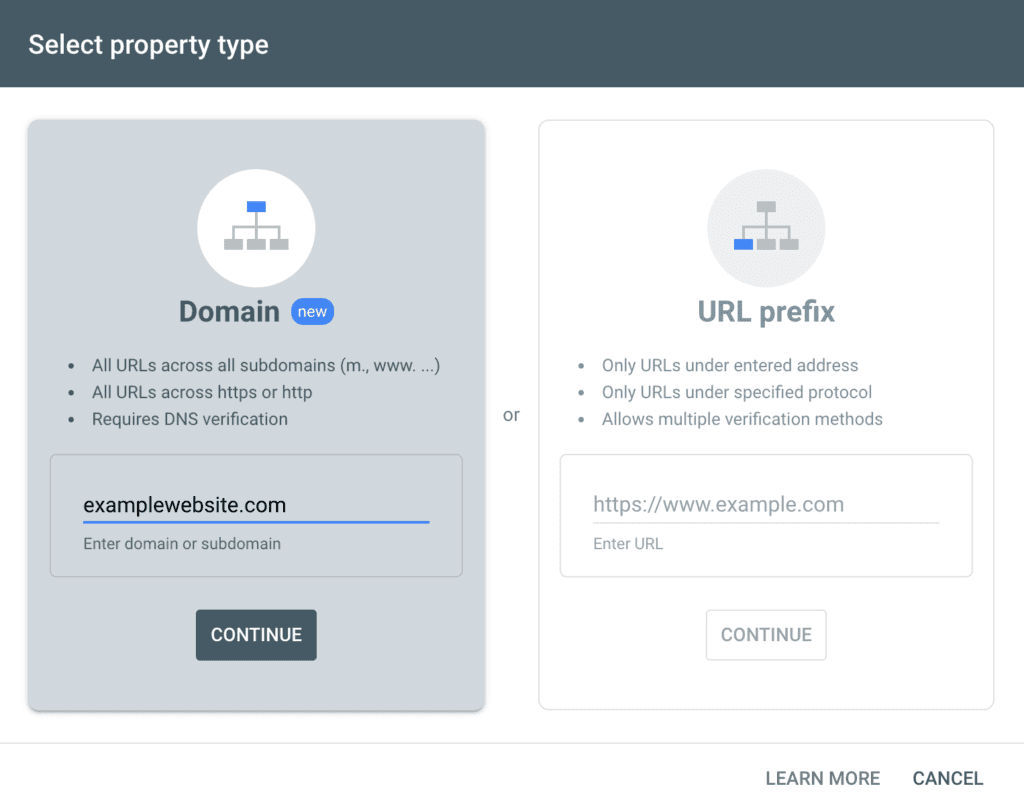
- You’ll be prompted to choose between Domain or URL prefix as your property type. Select Domain for a more comprehensive verification.
- Enter your domain name (e.g.,
example.com). Do NOT includehttp://orhttps://. - Click Continue.
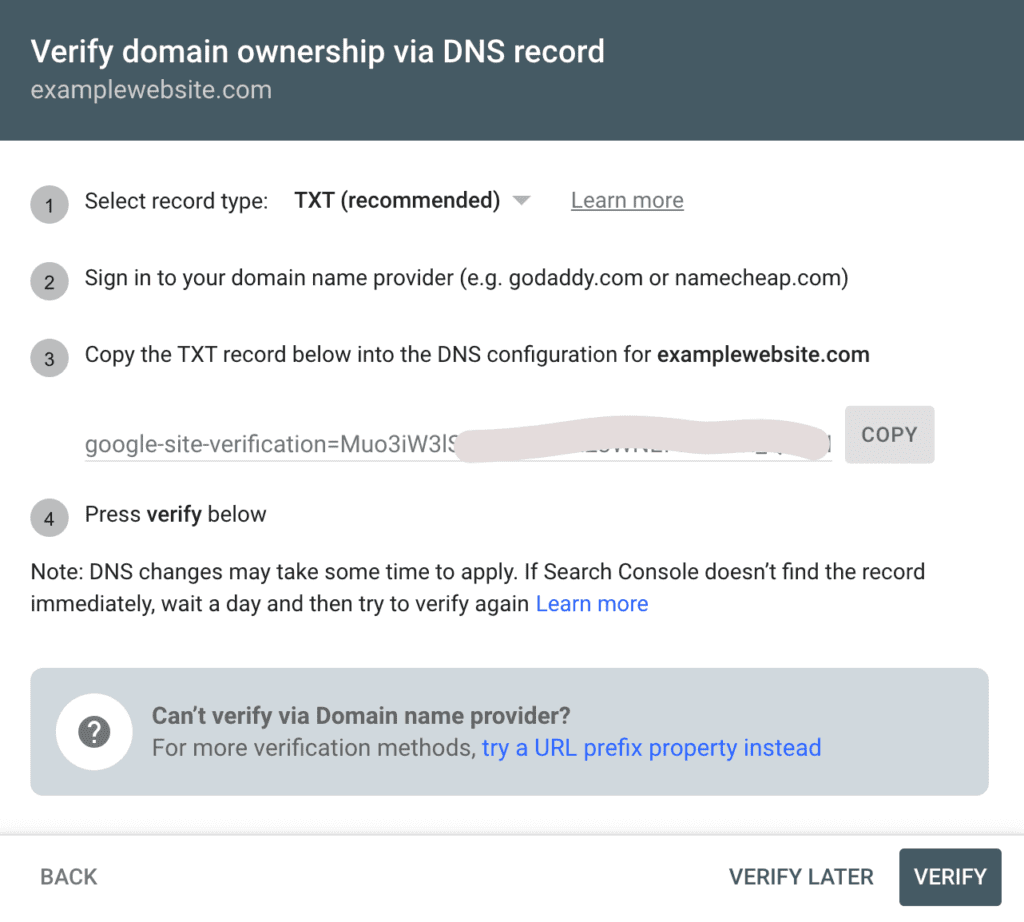
Step 3: Obtain the TXT Verification Record
Google will display a unique TXT record that you’ll need to add to your domain’s DNS settings. It should look something like this:
google-site-verification=abc123example
Copy this entire verification string, as you’ll need it in the next step.
Step 4: Log in to Your Domain Provider
To add the TXT record, you’ll need to access your domain’s DNS settings. This process varies by hosting provider (like GoDaddy, Namecheap, Bluehost, etc.), but typically, you can find DNS settings in the DNS Management or Domain Settings section of your provider’s website. If you are unsure who your domain provider is, you can use Whois Domain Lookup to find out. Once you are on the Whois Domain Lookup site and enter your domain, you’ll find the domain provider in the Domain Information section next to Registrar. Once you know your domain provider, you can:
- Log in to your domain provider account.
- Locate the DNS Management area (this is usually under Domain Settings or Advanced Settings).
- Look for an option to Add New Record or Add DNS Record.
Step 5: Add the TXT Record to DNS Settings
- Choose TXT as the record type.
- In the Name field (may also be called the Host, Hostname, or Alias), enter
@to apply the record to the entire domain. Some providers may require you to leave this field blank or may require some other specific protocol. Contact your domain provider if neither @ nor leaving it blank works. - In the TXT Value or Value field (may also be called the Data, Answer, Destination, or Record field), paste the TXT record verification string you copied from Google Search Console.
- Set the TTL (Time to Live) to the default value or the lowest option, such as 1 hour, to speed up the verification process. This likely will already be inputted for you.
- Save the new TXT record.
Step 6: Verify the Domain in Google Search Console
After adding the TXT record, go back to Google Search Console.
- In the verification window, click Verify.
- Google will check for the TXT record to confirm ownership. This may take a few minutes to several hours, depending on your domain provider’s DNS update time. Typically, the verification should not take very long though.
If Google successfully finds the TXT record, your domain will be verified. You’ll see a confirmation message, and you’ll now have access to data and tools for improving your site’s performance!

Troubleshooting Common Issues
If verification fails, here are a few tips to troubleshoot:
- Wait a bit longer: DNS changes can take some time to propagate, so try waiting for an hour or two before reattempting verification.
- Double-check the TXT record: Ensure that the record is entered correctly without any extra spaces or typos.
- Make sure you have the correct provider: Use Whois Domain Lookup website to confirm you have the correct domain provider.
- Check with your provider: Some domain providers have unique settings or extra steps for adding DNS records, so consult their support documentation if you’re experiencing issues.
Final Thoughts on How to Verify Domain Ownership on Google Search Console
Adding your site to Google Search Console and verifying ownership is a crucial step to understanding how to improve your SEO and how Google interacts with your website. Once verified, you’ll gain access to valuable tools like search performance analytics, coverage reports, and improvement suggestions. These are extremely valuable to people aiming to grow their businesses!
By following these steps to verify domain ownership on Google Search Console using a TXT record (the preferred method of verification), you are well on your way to fully optimizing your site and maximizing its reach on Google’s search results.
How Can Desert Rose Help Your Small Business Grow Online?
Are you ready to take control of your website’s SEO but looking for help with the process? Do you want assistance with getting Google Search Console or Google Analytics set-up for your website? Contact Desert Rose Design & Photo Co. to get help optimizing your small business website today!


0 Comments